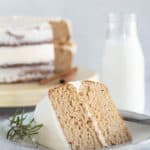
Low-Carb Keto Gingerbread Cake With Cream Cheese Frosting
This Keto Gingerbread Cake With Cream Cheese Frosting is ultra-soft, moist, and tender with all the warm spices of fall and ginger without being overpowering. No one will ever guess it's gluten-free & low-carb.
Servings 16 slices
Calories 243kcal
Ingredients
- 3 Cups Blanched Almond Flour finely ground
- ⅔ Cup Besti Coconut Flour Bob's Red Mill or Arrowhead Mills will also work
- ¾ tsp. Sea Salt
- 2 tsp. Baking Powder*
- ½ tsp. Baking Soda
- 1 Tbsp. Ground Ginger
- ½ tsp. Ground Cloves
- 2 tsp. Ground Cinnamon
- ¾ Cup Grass-Fed Butter (or non-dairy butter) softened
- 1 ½ Cups Brown Lakanto Sweetener or any brown sweetener
- 7 Large Eggs
- 3 Large Egg Whites
- 1 ¼ Cup Unsweetened, Non-Dairy Milk
- 1 teaspoon apple cider vinegar or white vinegar
- 1 Tbsp. Pure Vanilla
Frosting:
Instructions
- Preheat oven to 350 degrees and line two 8-inch baking pans with parchment paper and grease with oil.
- Set out butter to bring to room temperature. See the link below for a quick way to bring to room temperature. Then, cover the 10 eggs with warm water and set aside so they come to room temperature.
- In a medium-sized mixing bowl, whisk together the almond flour, coconut flour, sea salt, baking soda, baking powder, ginger, cloves, and cinnamon. Break up any clumps with your fingers.
- In a large mixing bowl, beat the room temperature butter and brown sweetener until light and fluffy. It may seem crumbly at first but keep beating until smooth, up to 5 minutes. Scrape down the sides with a rubber spatula if needed.
- Beat in the eggs and egg whites one at a time, then the non-dairy milk, vinegar, and vanilla.
- Turn mixer to low and beat in the dry ingredients until combined.
- Divide the batter between the prepared cake pans. Bake for 28 to 34 minutes, or until a toothpick inserted comes out clean and top is lightly golden. Since all ovens are different, check after 25 minutes to make sure it's not baking faster to ensure it doesn't dry out.
- Cool completely, then frost with Keto Cream Cheese Frosting.
Notes
- Use room temperature ingredients. If the ingredients are cold it can prevent the flours from mixing properly and can interfere with how the cake rises.
- Line the pans with parchment paper. If you skip the parchment paper you will have trouble with the cakes sticking to the pans so don’t skip it! To line the pans with parchment paper: 1) Place the pans on a large sheet of parchment paper. 2) Trace the bottom of the pans with a pencil. 3) Cut the parchment paper using the lines you traced. 4) Grease the pan, place the parchment paper in the pan, then grease the parchment paper. This will ensure easy removal and the cakes will slide right out.
- Completely cool cake layers before frosting. If you try to assemble or frost the cake even if it’s the slightest bit warm, it will be a disaster! To ensure the cakes are completely cool after they come to room temperature I cover mine in plastic wrap and place them in the fridge. It can be refrigerated up to one day before frosting.
- Refrigerate cake after frosting. After the cake is frosted, place it in the fridge for 1 hour. This allows time for the cake and frosting to re-set, as it were. It will also ensure clean slices without crumbs.
- To check the size of your cake pan, cake pans are measured across the top, not the bottom. Do not measure from the outside edges, as you do not want to include the thickness of the pan. If you are not using an 8-inch cake pan, adjust baking times accordingly.
- A word of caution: not all coconut flours are the same! Some brands are much more absorbent than others. Because of this, I only recommend using Bob's Red Mill or Arrowhead Mills. These are the 2 brands I know will work. If you need to use another brand, I can't guarantee the results, but look for one that is soft and fluffy, not gritty.
- I love this tutorial on How To Soften Butter Quickly from Sally’s Baking Addiction to get the butter room temperature.
- If you need a little help with the frosting, check out my easy, step-by-step tutorial on how to frost a naked cake or a semi-naked cake! It's a gorgeous rustic and chic style that looks difficult, but the tutorial will make even the most cake decorating challenged person able to master it!
- As a special gift to my readers, I've teamed up with BESTI to give you guys 10% off! Simply use the code "CRAVEABLE" at checkout.
Nutrition
Serving: 1slice | Calories: 243kcal | Carbohydrates: 37g | Protein: 8g | Fat: 20g | Saturated Fat: 11g | Polyunsaturated Fat: 1g | Monounsaturated Fat: 3g | Trans Fat: 1g | Cholesterol: 132mg | Sodium: 418mg | Potassium: 163mg | Fiber: 33g | Sugar: 2g | Vitamin A: 585IU | Vitamin C: 1mg | Calcium: 103mg | Iron: 2mg