

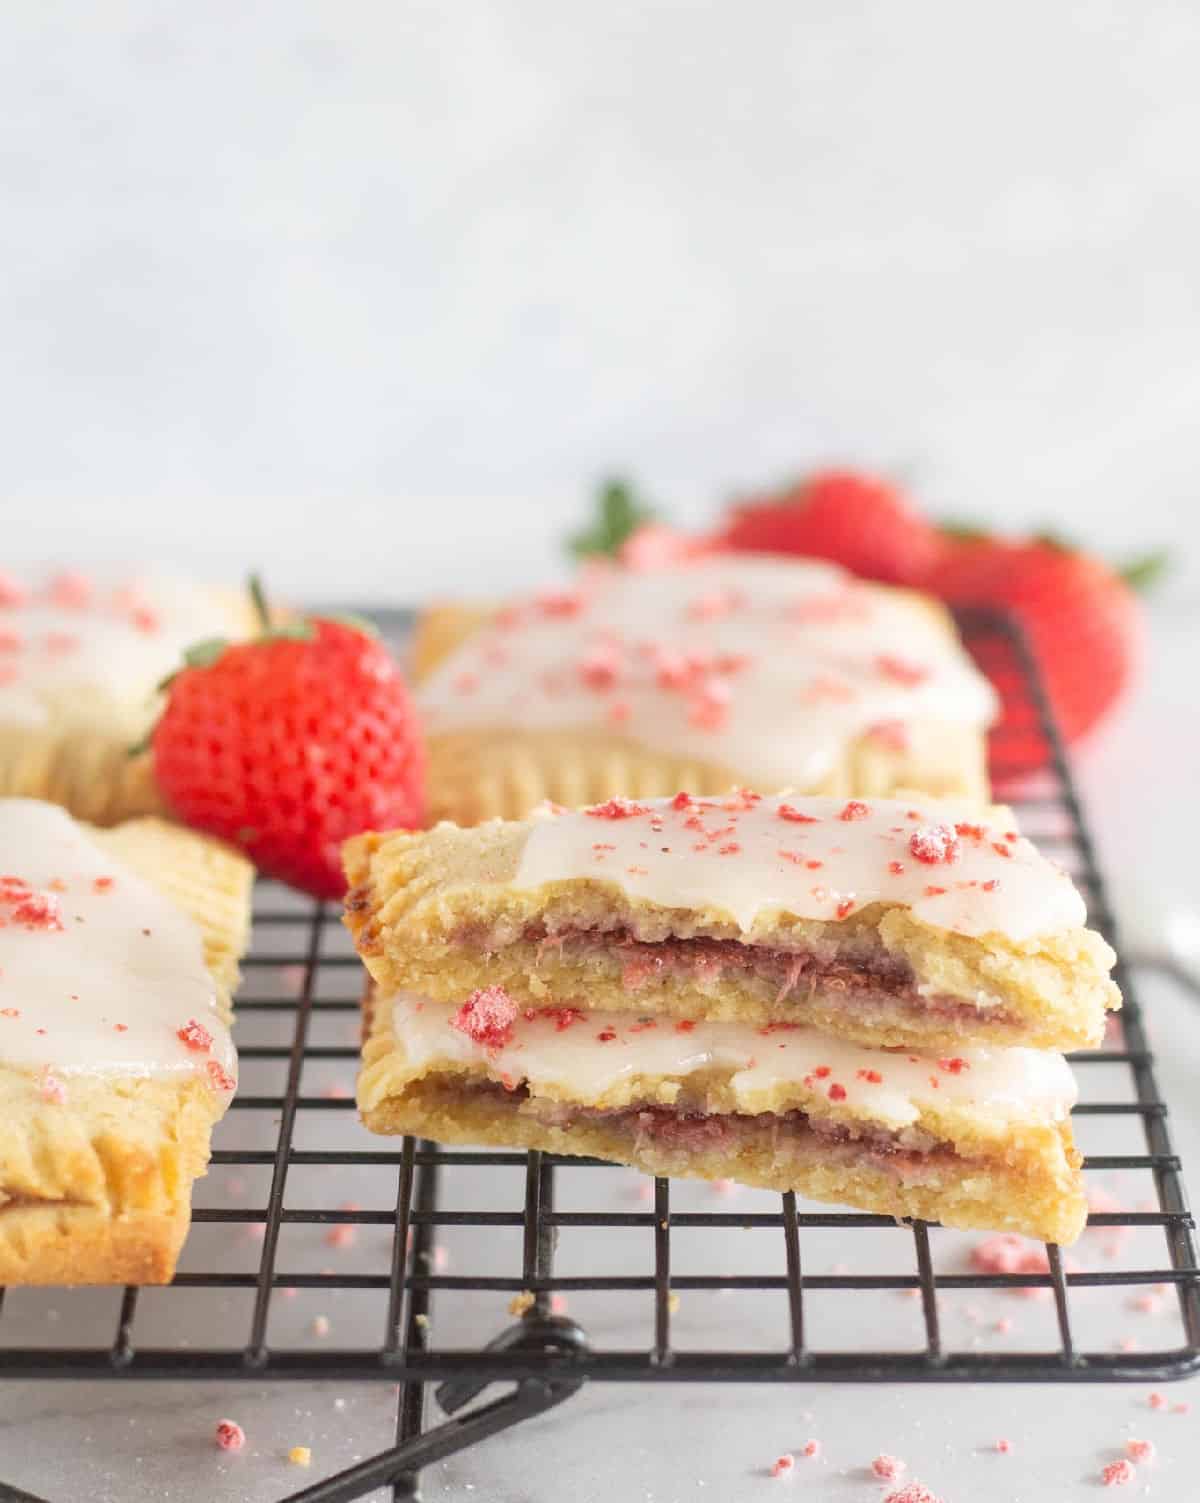
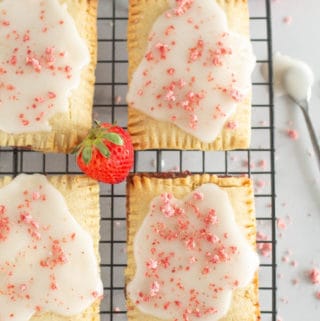
These gluten-free and keto pop-tarts have a flaky, buttery crust with a fresh strawberry filling and are even better than the boxed variety!
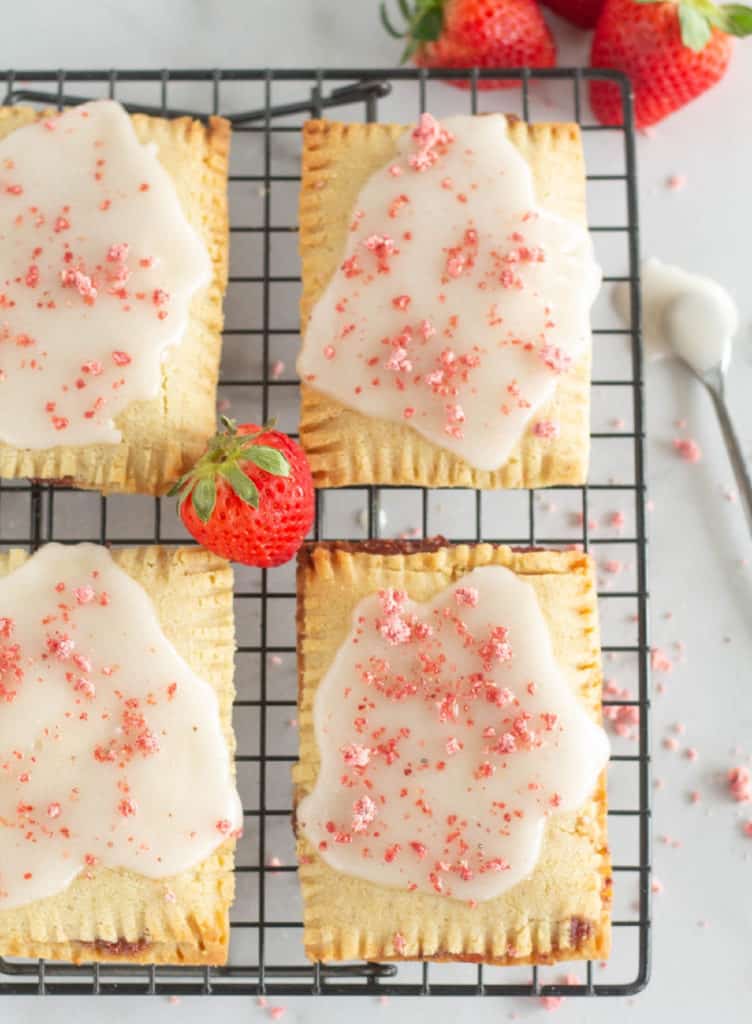
Did someone say Gluten-Free & Keto Pop-Tarts?!? Uhm - yes, please!
They're flakey, fruity, and just as good (if not better!) than the original.
They are perfect for breakfast or as a sweet treat or dessert throughout the day.
Or if you're looking for more breakfast recipes, I think you'll love these Keto Oatmeal, Coconut Flour Pancakes, and Keto Drop Biscuit Recipes!
Or if you're not low-carb, I think these Gluten-Free Pop Tarts from This Vivacious Life look yummy also!
Back to the low-carb pop-tarts... they consist of 3 parts:
- The crust, which is made by using my Keto Pie Crust
- A simple fruit filling
- And the glaze and sprinkles
But before we dive into the instructions, here are some things you need to know...
Before you start
- The one thing you have to have for this recipe is patience! While not difficult (I'll take you through step-by-step), you can't be in a hurry. It takes time to roll out, measure, and cut the dough. Plus, the dough has to be cold or it becomes difficult to handle. This means that you may have to randomly place the dough in the freezer for around 15 minutes to chill before you can continue with the recipe.
- There are a lot of steps. However, you can pre-make the crust and the filling. The crust can be stored in the fridge for up to 3 days or frozen for up to 3 months. If frozen, just allow it to rest on the counter until it's soft enough to handle before using. The filling can be stored in the fridge for a week or two.
- I highly recommend reading each step and looking at all the pictures before starting to get a clear idea of the recipe.
Keto sweetener
For the sugar-free sweetener in the filling, I prefer to use a Monk Fruit Allulose Blend or pure allulose. Monk fruit and allulose both dissolve beautifully without an aftertaste. Since they dissolve well, you can use crystallized or powdered.
However, if using an erythritol-based sweetener, make sure it's powdered because erythritol doesn't dissolve as well as other sweeteners. Also, it may leave a slight cooling-like aftertaste, which is another reason I prefer the monk fruit allulose blend.
For the frosting, any powdered keto sweetener will work. But again, erythritol-based sweeteners can leave an aftertaste - especially in frostings!
So for the frosting, I recommend powdered monk fruit, allulose, or a monk fruit allulose blend.
*Note-As a special gift to my readers, I've teamed up with BESTI SWEETENERS to give you guys 10% off! Simply use the code "CRAVEABLE" at checkout.
🔪 Instructions
Filling
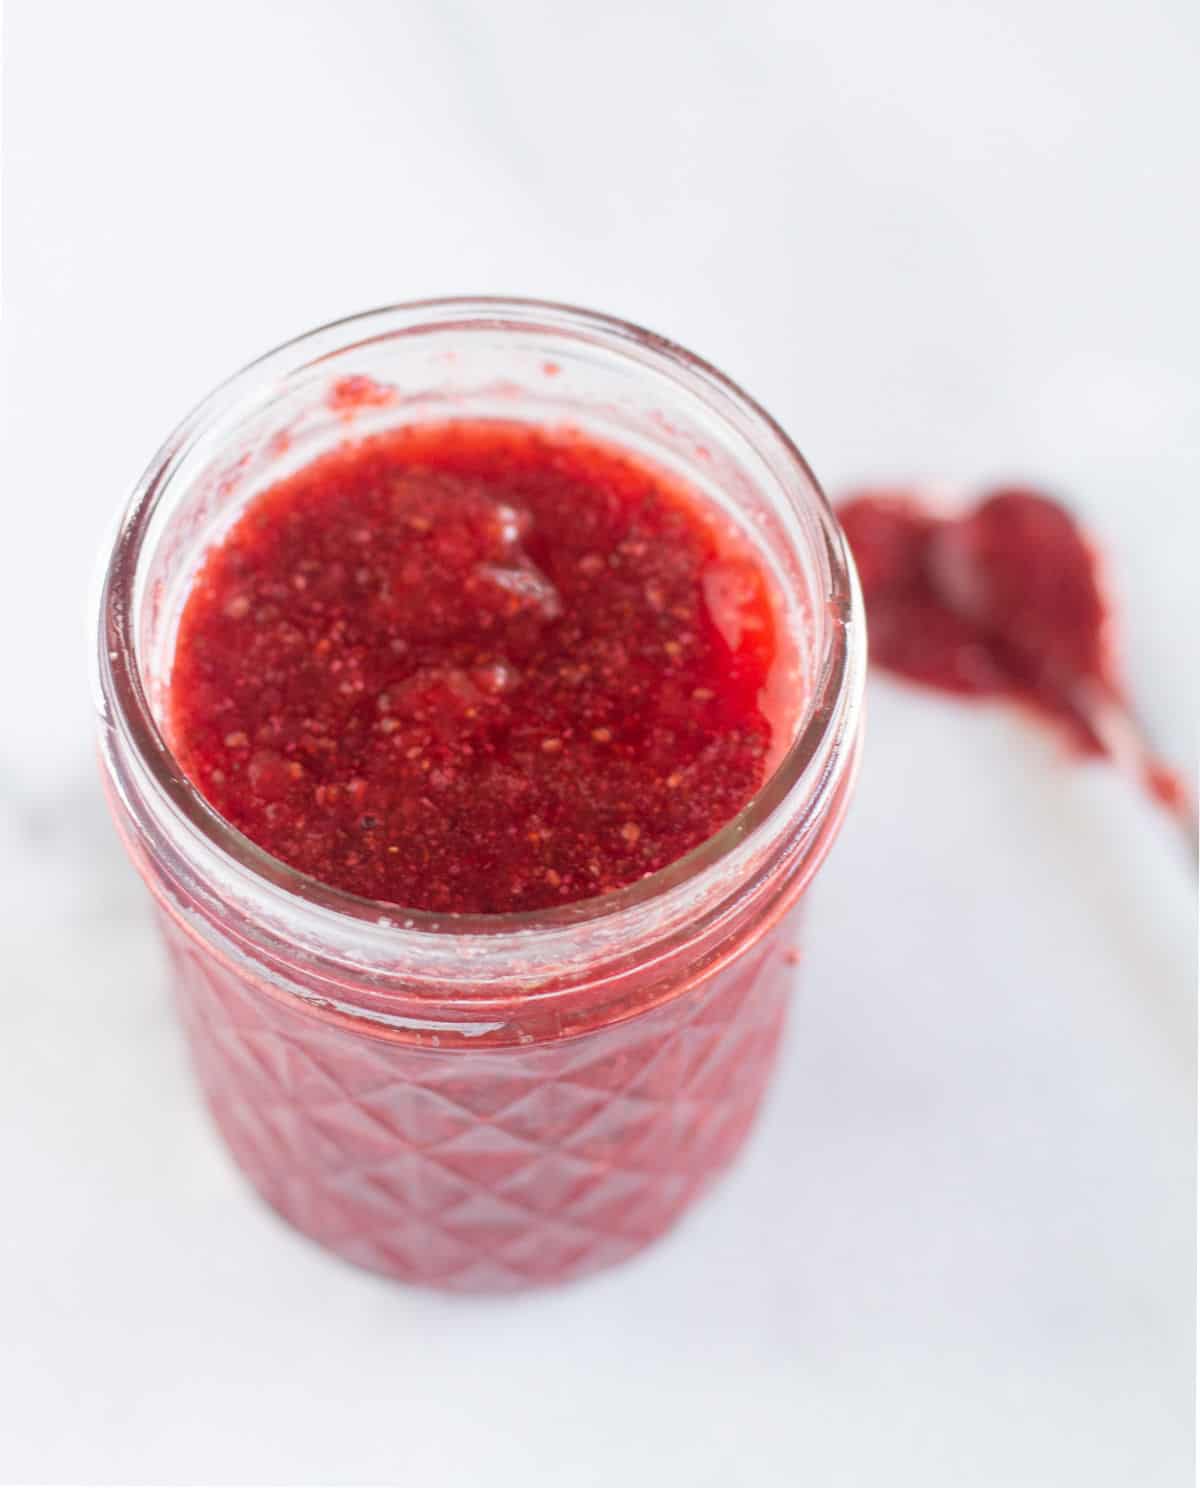
For the filling, add 2 cups of berries of choice (I used strawberries, which can be fresh or frozen) to a medium-sized saucepan.
Place over medium heat and allow to cook for about 5 minutes, or until the berries start breaking down.
Mash with a fork, then add some lemon juice and sweetener. Allow to cook for about 5 more minutes.
Then, stir in some ground chia seeds to help it thicken and pure vanilla.
Allow to cool then place it in the fridge until we're ready to use it.
Crust
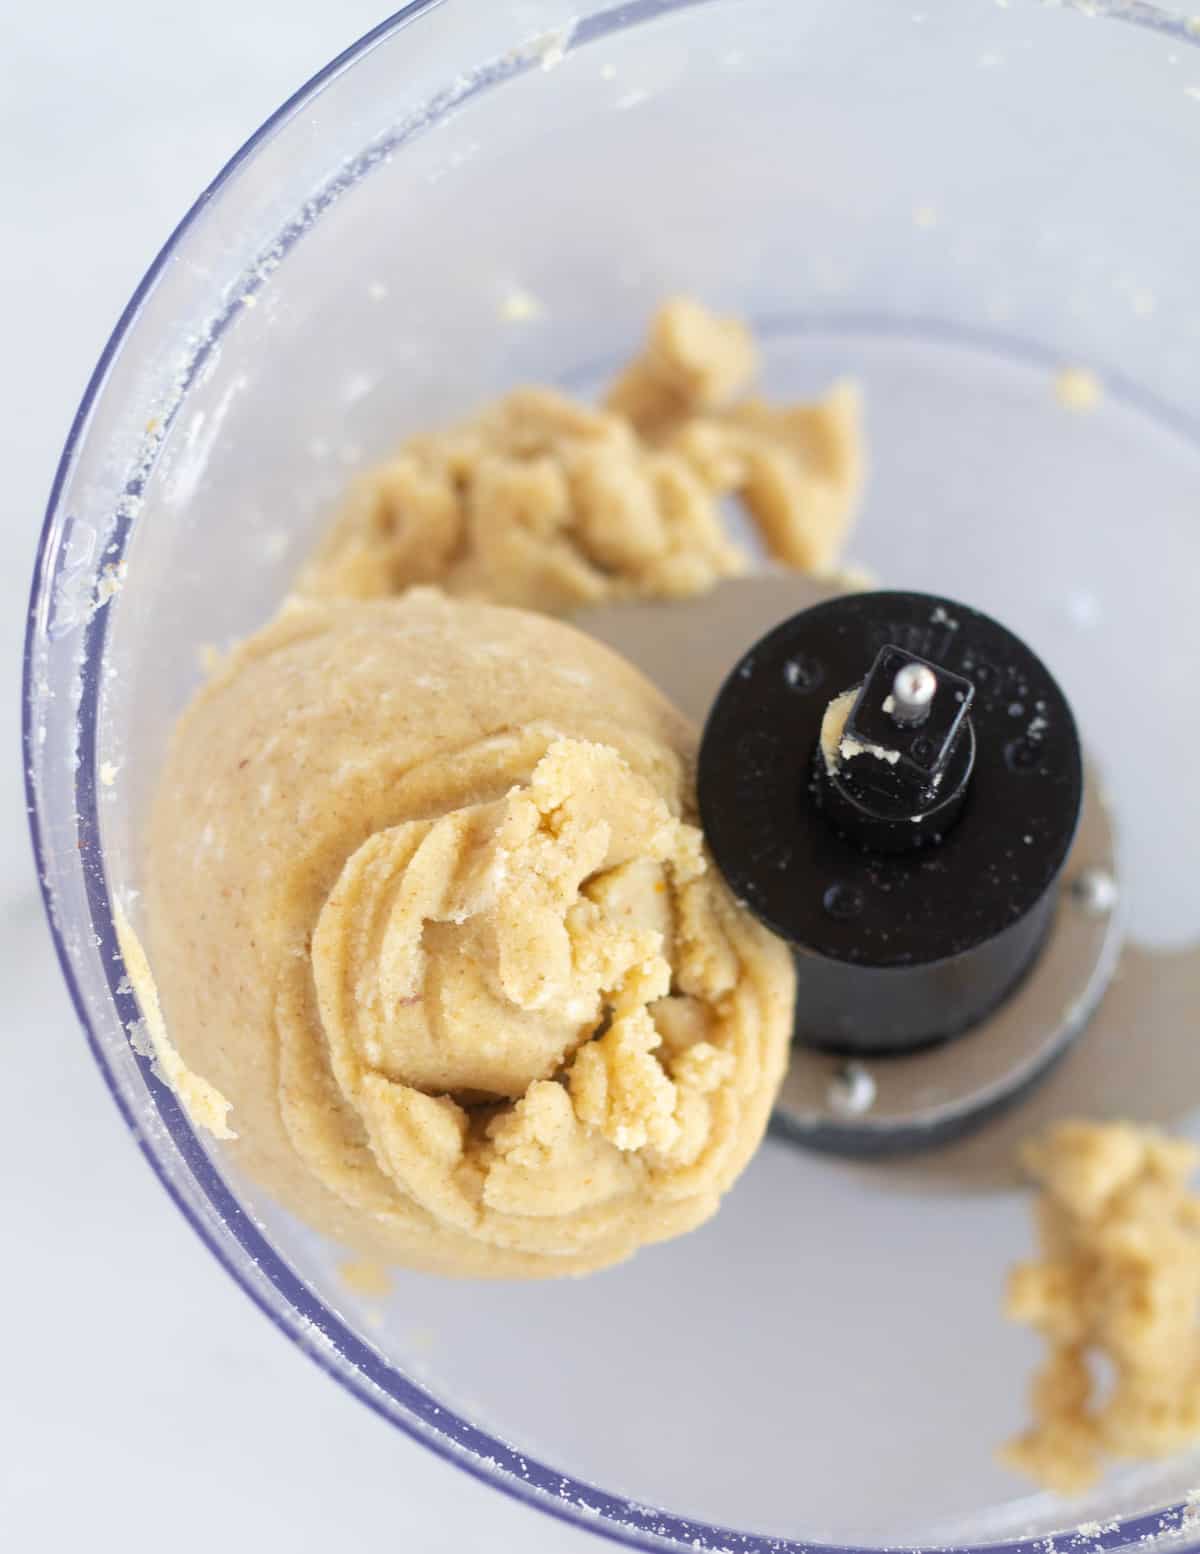
Start by preparing a double keto pie crust. I highly recommend using the xanthan gum option over the psyllium husks. Xanthan gum lends a much better texture to pop-tarts.
There will be just a little crust left over, but it's better to have too much than not enough!
Place in the fridge for at least an hour or in the freezer for 15 to 20 minutes before using to ensure that it's nice and cold.
Rolling out and cutting the crust
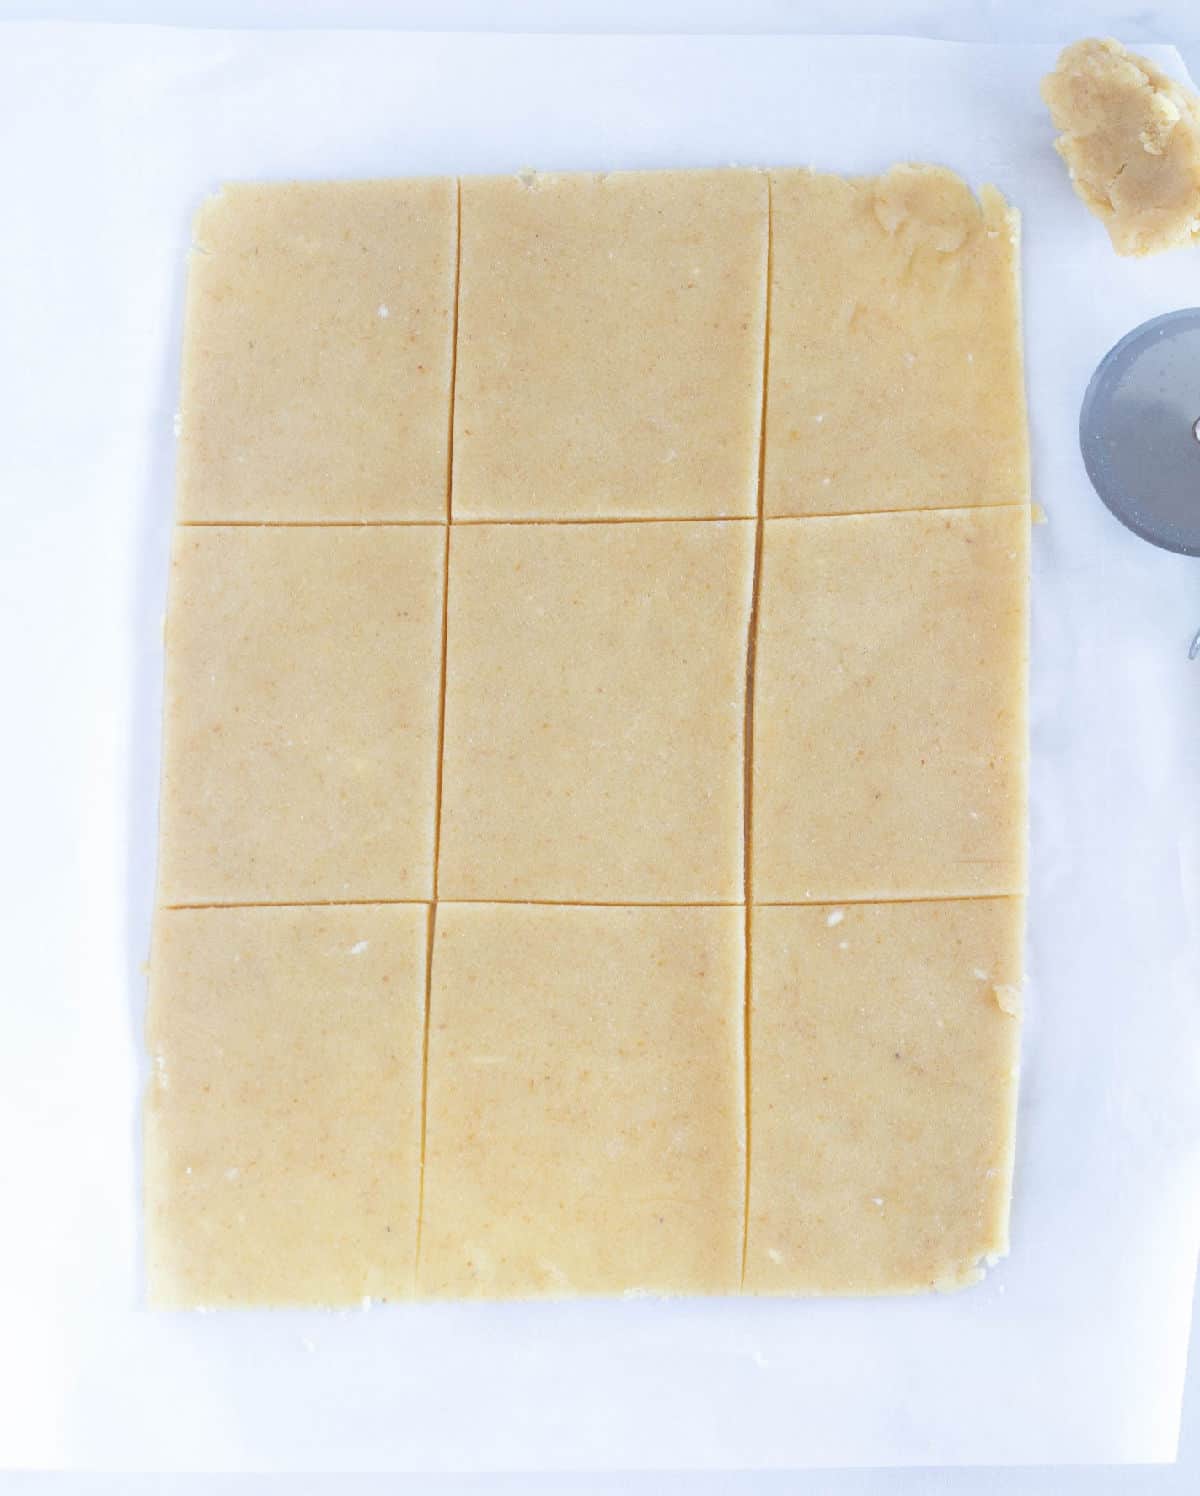
Take half of the dough out of the fridge or freezer and place it onto a large piece of parchment paper. These will be the bottom half of the pop-tarts.
Form it into a rectangle, then cover it with plastic wrap and roll it into a rectangle that's at least 9x12 inches.
Be sure to roll the crust out to be at least ⅛th inch thick or less. I recommend closer to 1/16th of an inch. The thinner the crust, the crispier the pop tarts will be.
Then, using a sharp knife or pizza cutter, cut a 9x12-inch rectangle and remove the excess dough around the edges.
Cut the dough evenly into thirds both horizontally and vertically (2 lines each way, like a tic-tac-toe pattern), making 9 rectangles.
By this time, the dough is probably warming up, so slide it onto a cutting board and place it in the fridge or freezer for a while.
Then, do the same thing with the other half of the dough. These will be the top half of the pop tarts.
Assembling
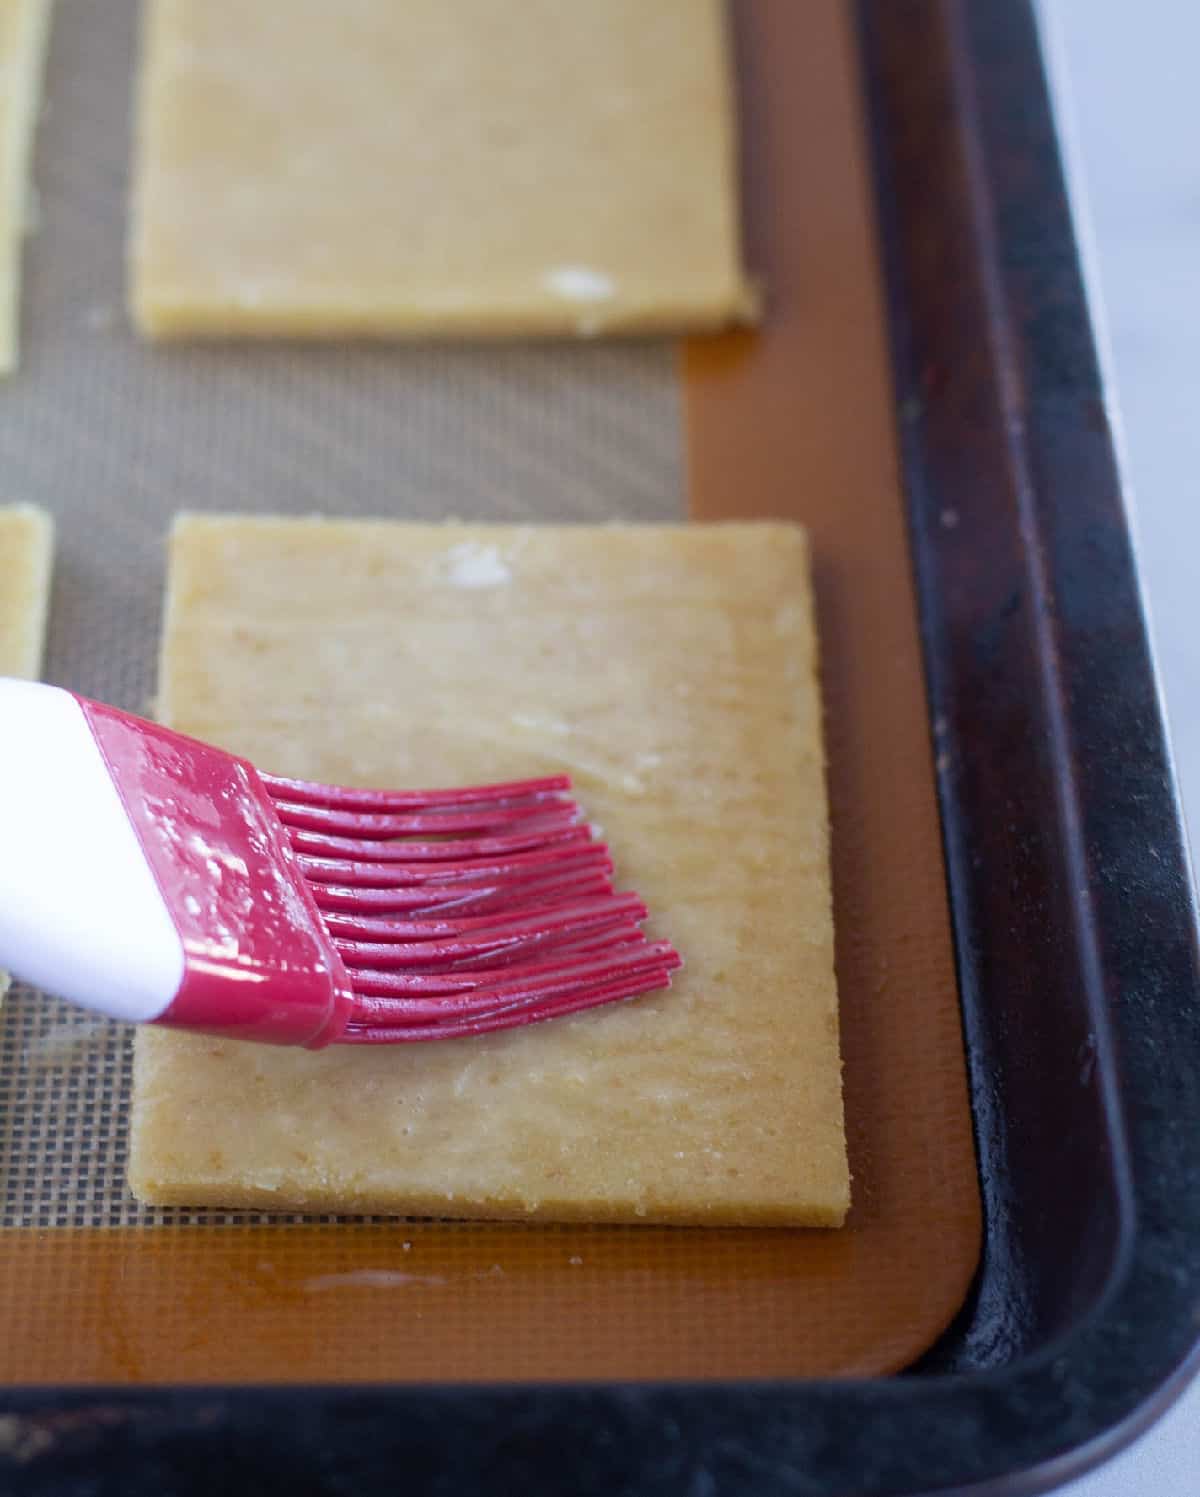
Take the first half of the dough out of the fridge or freezer. Use a metal spatula to transfer the rectangles to a lined baking sheet and brush with an egg wash.
The egg wash will help the top crust stick to the bottom crust.
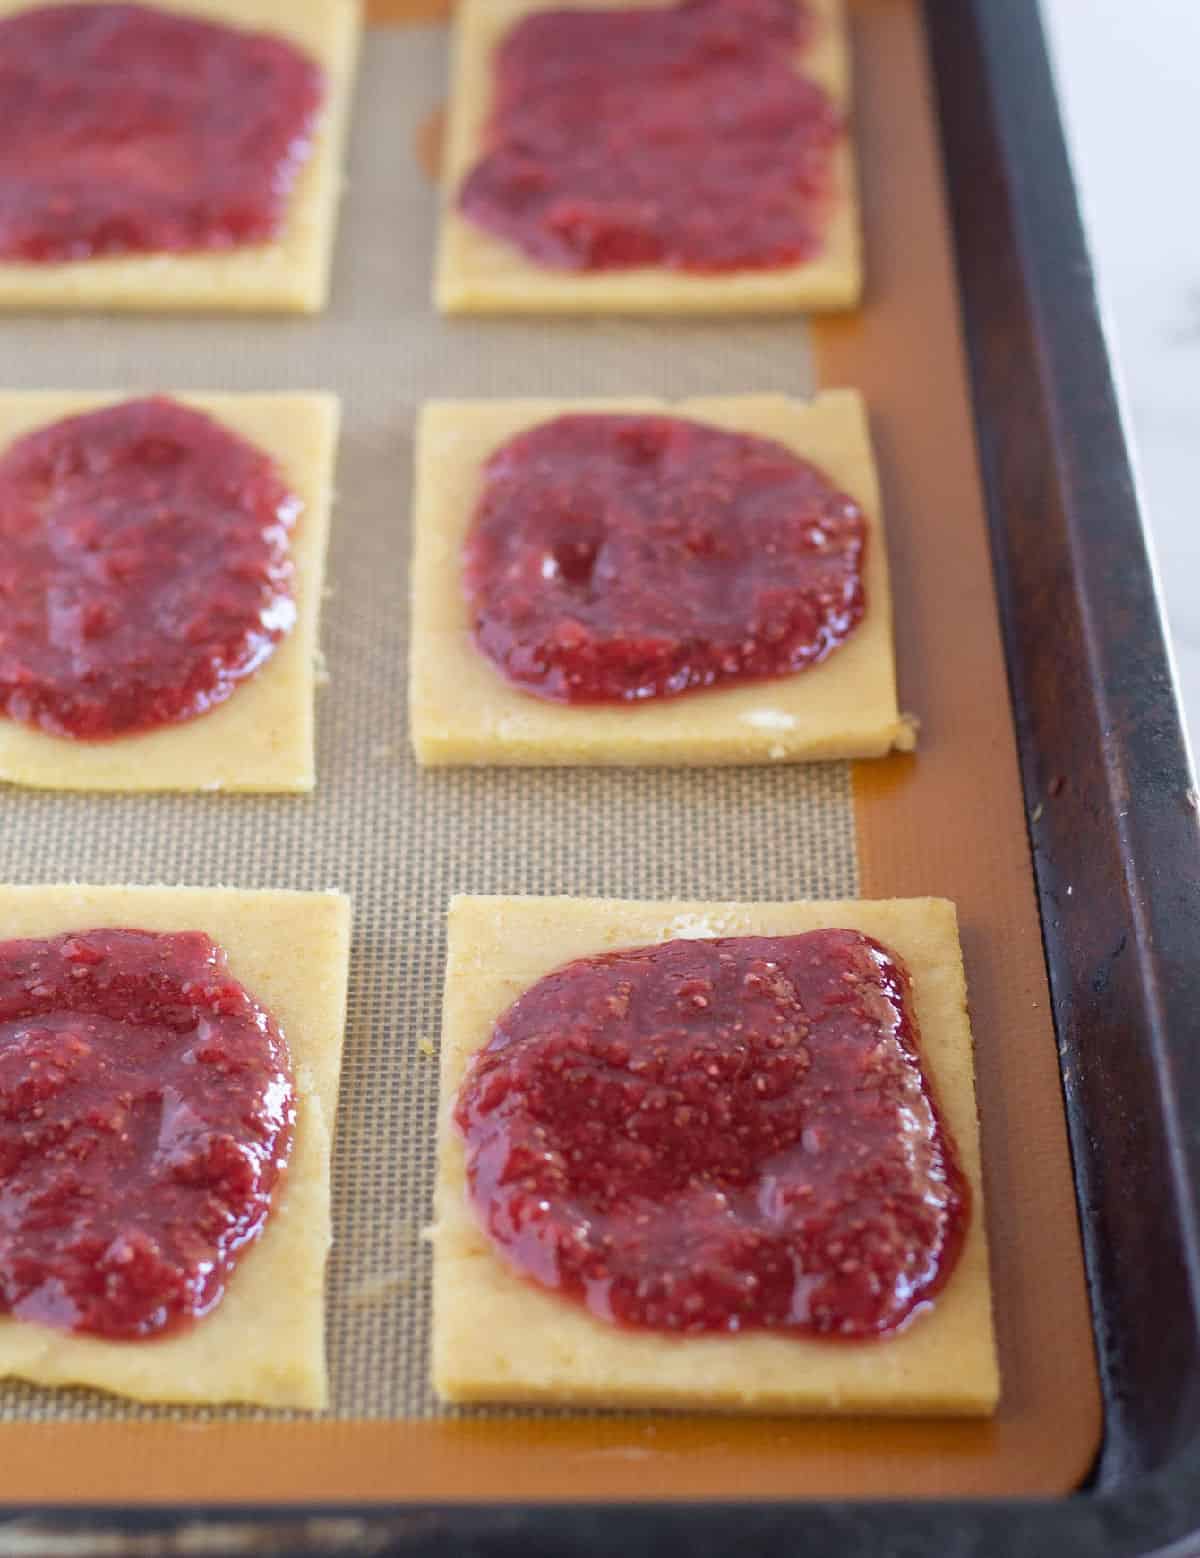
Spoon about a tablespoon of filling into the center of each crust, leaving the edges bare.
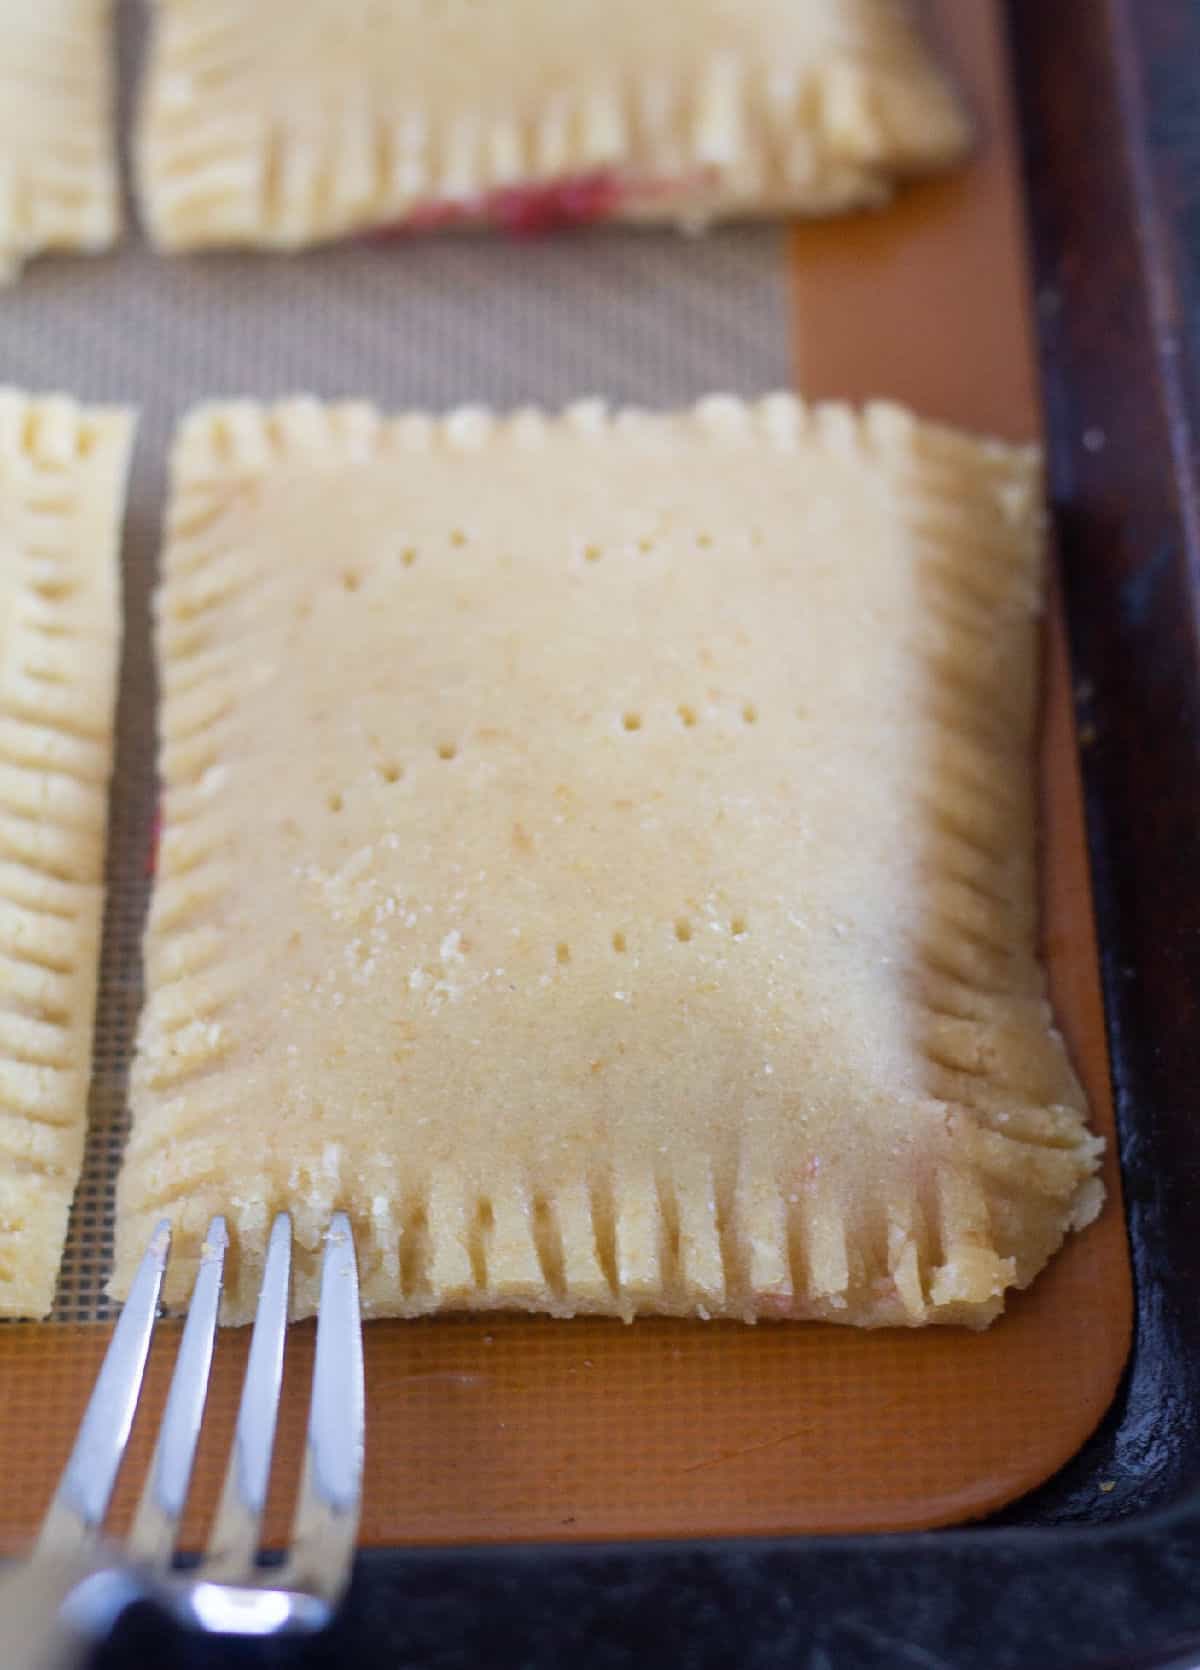
Using the same metal spatula, add the tops.
Using your fingers or fork, press the edges together. Try not to make the edges too thin or they'll burn! Then, prick the tops of the crust with the fork three or four times to allow steam to escape.
Baking
Preheat the oven to 350 degrees and place the keto pop tarts in the freezer for 10 to 15 minutes, or until cold to the touch. This will make them more flakey.
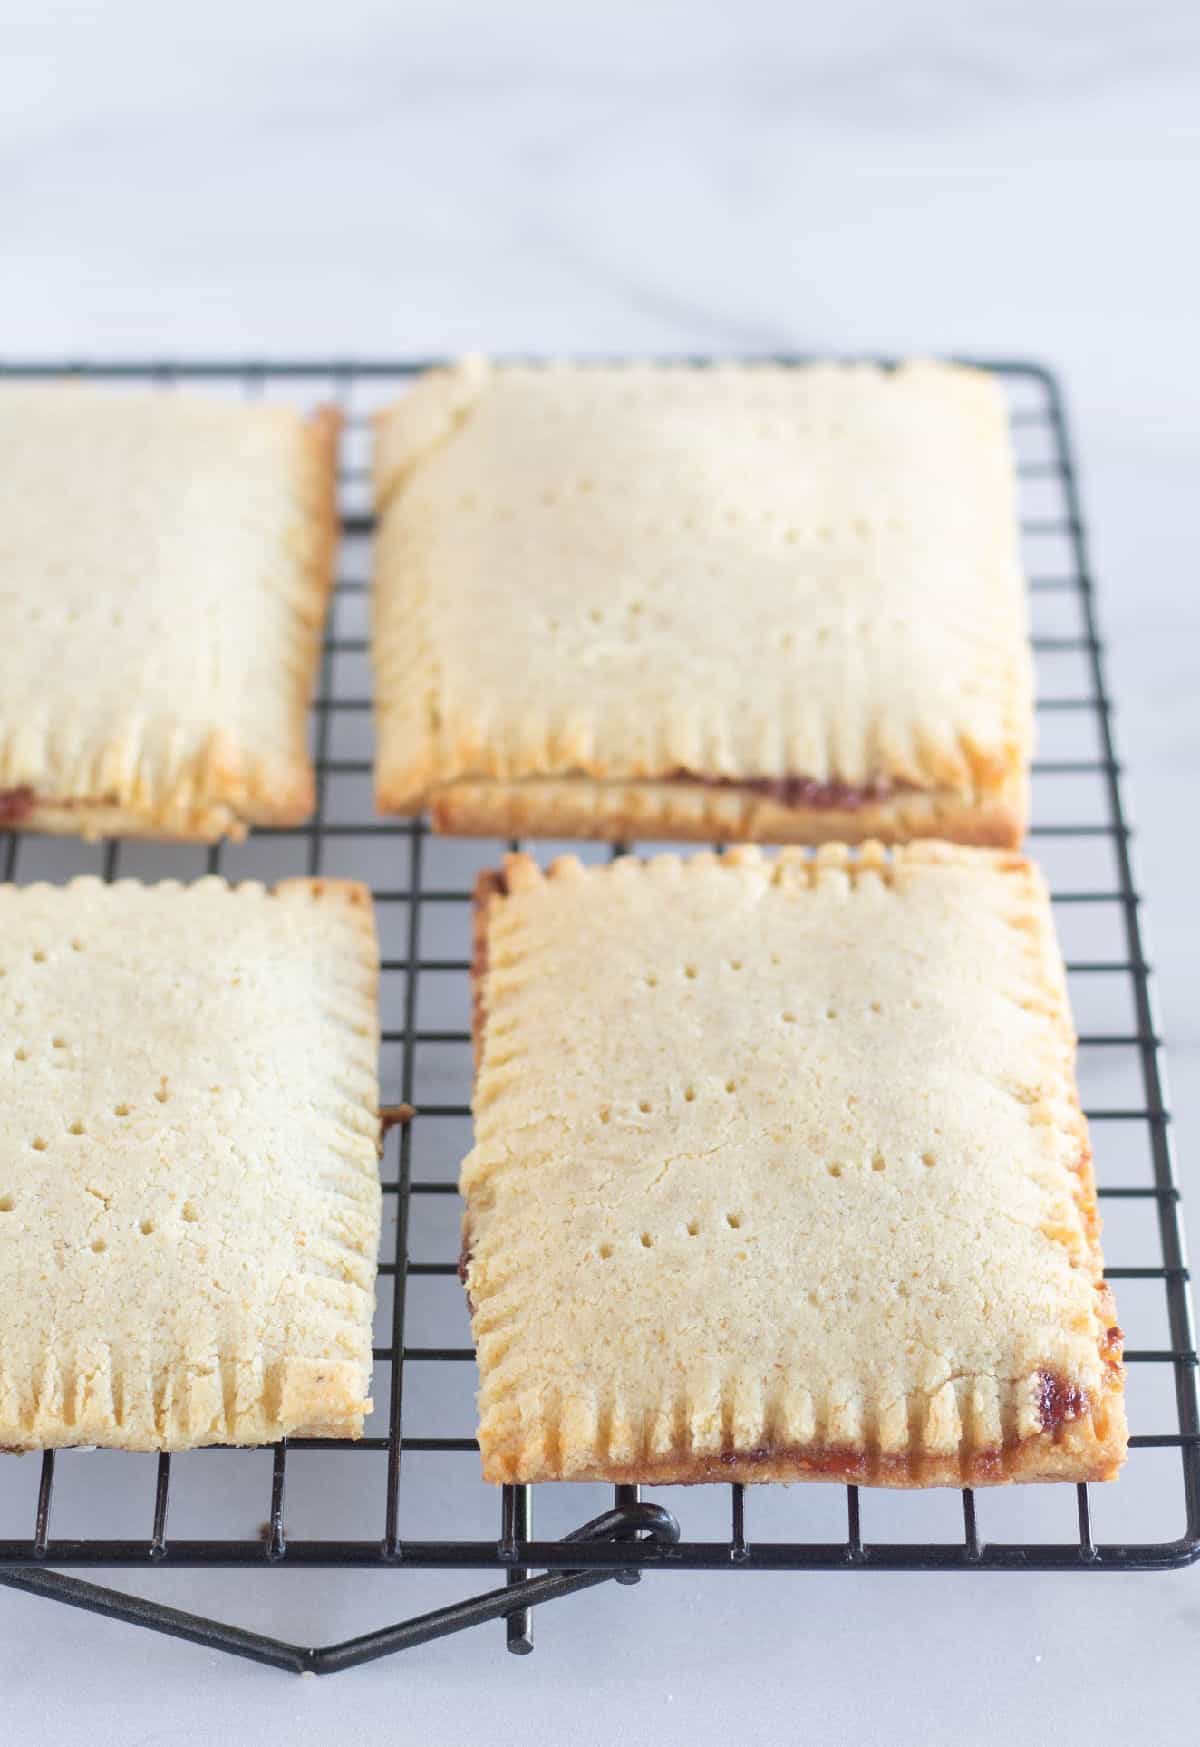
Brush the tops with the remaining egg wash and bake for 15 to 20 minutes, or until nicely browned.
Cool completely on a cooling rack before frosting.
Frosting and sprinkles
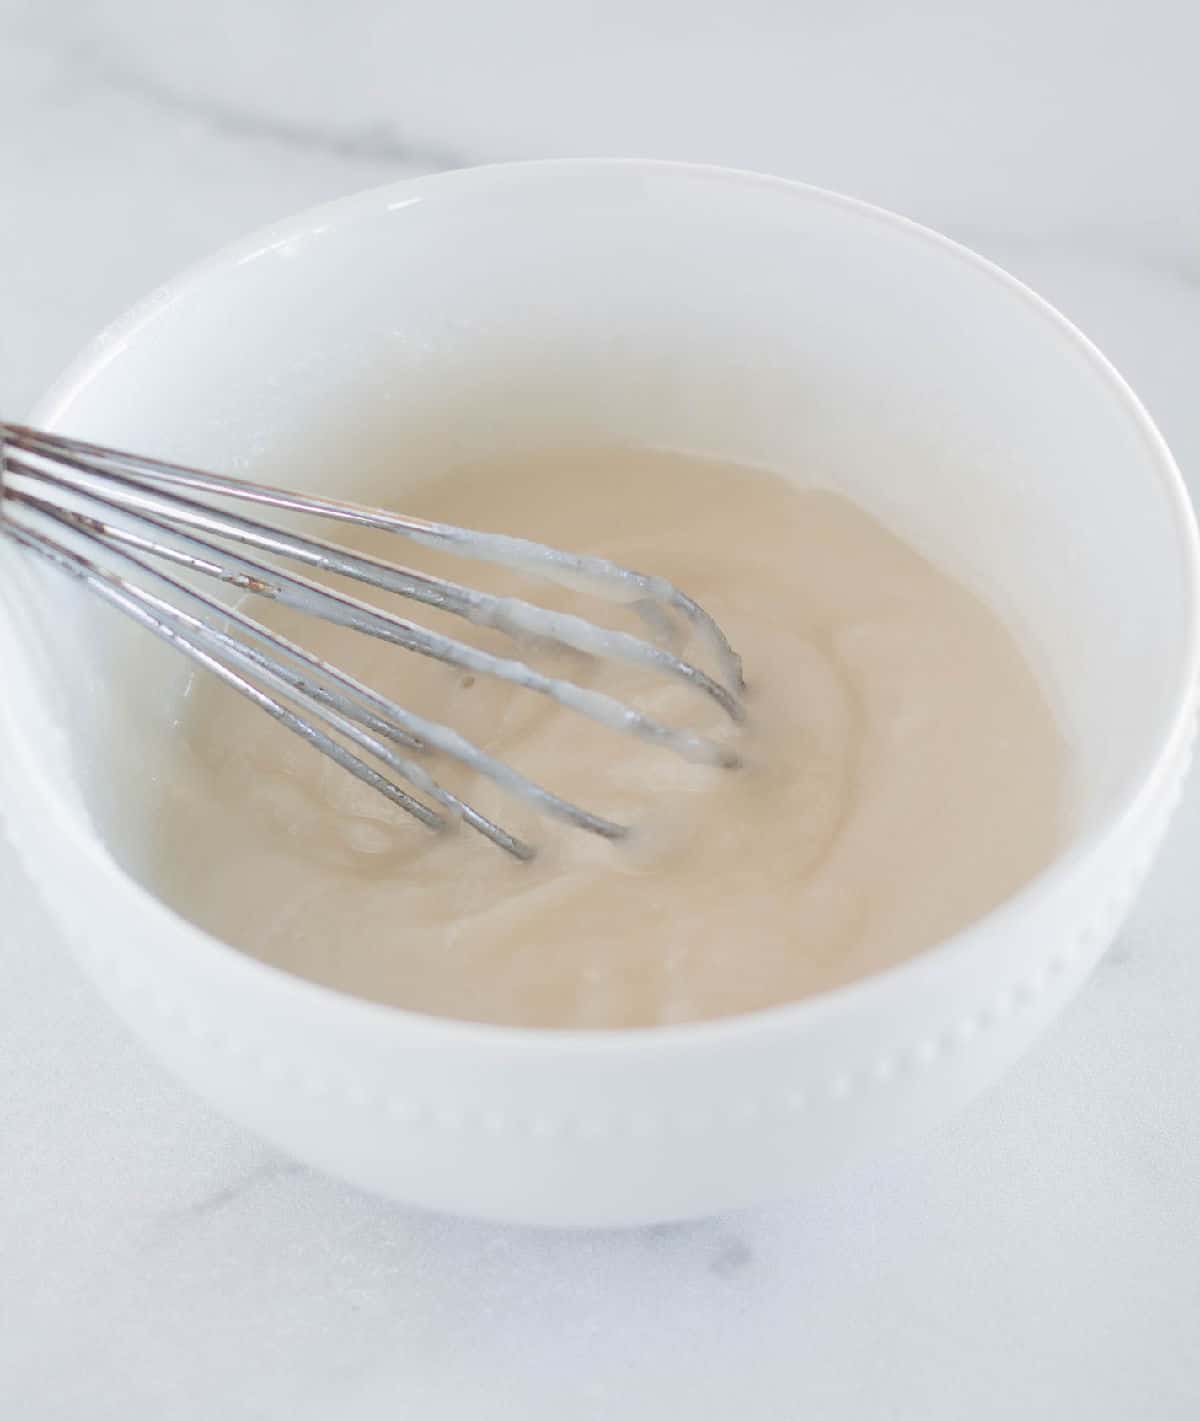
For the frosting, whisk together powdered keto sweetener, non-dairy milk, and pure vanilla.
Be sure not to frost the pop-tarts until they're completely cool! Otherwise, it will just melt right off.
Spoon a little frosting over each pop tart then top with sprinkles.
For the sprinkles, place freeze-dried strawberries (or whatever fruit you need to match the filling) and some keto powdered sweetener in a totally dry blender and blend until it resembles sprinkles.
My blender wasn't totally dry so my sprinkles started to clump, so make sure yours is dry!
💭Tip: Only frost the ones you plan on eating because they don't store or reheat well with frosting!
Storage
- Store: Unfrosted pop tarts can be stored, covered, at room temperature for 1 to 2 days. I don't recommend storing them in the fridge because they may get soggy.
- Freeze: Freeze unfrosted keto pop-tarts in a freezer-safe container for up to 3 months.
- Reheat: These can be reheated in the oven at 350 degrees for 5 minutes, for a few seconds in the microwave, or in the toaster as long as you don't over-toast them! The crust is a bit fragile, so if you over-toast them, they will get too hot and break apart. However, you can toast them until just heated through. And since the crust is fragile, you may need to let it slightly cool in the toaster before removing it. Then, allow it to cool, and add the frosting and sprinkles!
Leftover pie crust
You will have a little bit of leftover pie crust after making this recipe.
I like to make thumbprint cookies out of them!
To do this, form the dough into small cookies and place them on a lined baking sheet. Press the center of the cookies with your thumb to make an indention.
Fill the indention with leftover filling or preserves. Bake at 350 degrees for 15 - 20 minutes, or until the edges are nicely browned.
Variations
Here are some fun flavor variations for your sugar-free pastries:
- Brown Sugar & Cinnamon: For the filling, mix allulose or a keto brown sweetener (may leave an aftertaste) with cinnamon with melted butter. Then, top with additional sweetener and cinnamon.
- Berry: Blueberry, Raspberry (or this sugar-free raspberry sauce), Strawberry, etc... Use any berry of choice for the filling.
- Lemon: Fill with keto lemon curd, and grate lemon zest over the frosting.
Substitutions
- For paleo, you can replace the keto crust with this paleo pie crust recipe and use a paleo-approved sweetener, such as coconut palm sugar.
Top tips
- If the starts to get hard to work with, place it in the freezer for around 15 minutes to chill before you can continue with the recipe.
- Be sure to freeze the low-carb pastries before baking, this will make them more flakey.
- When making the sprinkles, be sure the blender is totally dry, otherwise, the sprinkles will clump!
- Only frost the ones you plan on eating because they don't store well after they're frosted.
- Be careful to not make the edges too thin, or they'll burn!
If you’ve tried this Keto Pop-Tarts Recipe, please let me know what you think in the comments below 👇
Craving more? FOLLOW ME on Pinterest, Instagram, Facebook, YouTube, or E-Mail to find more delicious food!
📖 Recipe
Sugar Free Keto Pop Tarts
Ingredients
- Double Keto Pie Crust - unbaked (I highly recommend using the xanthan gum option for this recipe instead of psyllium husks!)
- 1 large Egg
- 2 teaspoon Water
Fruit Filling:
- 2 cups Berries Of Choice (I used Strawberries) - fresh or frozen
- 1 Tbsp. Lemon Juice - fresh is best
- 4-6 tablespoon Allulose - see notes below for substitutions, to taste
- 2 tablespoon Ground Chia Seeds
- ½ tsp. Pure Vanilla
Frosting:
- ¾ Cup Keto Powdered Sweetener - see notes below
- 1 - 2 tablespoon Non-Dairy Milk - as needed
- ¼ tsp. Pure Vanilla
Sprinkles:
- 1 oz Freeze Dried Berries - use the same berries to match the filling, I used strawberries
- 1 tsp. Allulose Or Keto Powdered Sweetener
Instructions
- Please read through the entire recipe and the notes before starting so you can get all my helpful tips to ensure these will turn out successfully and have a clear idea of the recipe! It might also be helpful to look through all the step-by-step pictures in the post.
- Prepare a double batch of the keto pie crust and allow to rest in the fridge for at least one hour, or up to 3 days, or in the freezer for up to 3 months. If the crust is frozen, allow to rest on the counter until it becomes soft enough to work with.
- Take half of the dough out of the fridge or freezer and place it onto a large piece of parchment paper. Form it into a rectangle, then cover with plastic wrap and roll it into a rectangle that's at least 9x12 inches. Be sure to roll the crust out to be at least ⅛th inch thick or less. I recommend closer to 1/16th of an inch. The thinner the crust, the crispier the pop tarts will be.
- Then, using a sharp knife or pizza cutter, cut a 9x12 inch rectangle and remove the excess dough around the edges. Cut the dough evenly into thirds both horizontally and vertically (2 lines each way, like a tic-tac-toe pattern), making 9 rectangles. These will be the bottom half of the pop tarts. Slide the parchment paper with dough onto a cutting board and place it in the freezer.
- Then, repeat with the other half of the dough and place it in the freezer as well when finished. These will be the top half of the pop tarts.
- Line a large baking sheet with parchment paper or silpat and whisk together the egg and water in a small bowl.
- Take the bottom half of the pop tarts out the freezer and use a metal spatula to carefully transfer each rectangle to the prepared baking sheet.
- Brush each rectangle with the egg wash.
- Add about 1 heaping Tablespoon of the fruit filling to the center of each rectangle, leaving the edges bare.
- Take the top half of the pop tarts out of the freezer. Using the metal spatula, add the tops to the pop tarts.
- Using your fingers or fork, press the edges together. Try not to make the edges too thin or they'll burn! Then, prick the tops of the crust with the fork three or four times to allow steam to escape.
- Preheat oven to 350 degrees and place the pop tarts in the freezer. Freeze for at least 10 minutes, or until cold to the touch.
- Brush the tops with the remaining egg wash and bake for 15 - 20 minutes, or until nicely browned.
- Allow to cool 10 minutes on the baking sheet, then transfer to a cooling rack to cool completely. Pop-tarts will be fragile when hot.
- Once cool, top with glaze and sprinkles. Enjoy!Tip- Only frost the ones you plan on eating, as these do not store well with frosting. Also, don't try to frost them while hot or the glaze will slide right off!
Fruit Filling:
- Add the berries to a medium-sized saucepan and heat over medium heat. Cook for 5 minutes, or until the berries start breaking down.
- Add the lemon juice and sweetener. Mash with a fork and cook an additional 5 minutes.
- Mash again with a fork or leave it chunky, it's up to you. Remove from heat. Stir in the chia seeds and vanilla. Set aside and allow to cool before using.
- Store in an airtight container in the fridge for one to two weeks.
Glaze:
- Whisk together all the glaze ingredients in a small bowl. Add more non-dairy milk to thin and more powdered sweetener to thicken as needed.
Sprinkles:
- Add the freeze-dried fruit and sweetener to a completely dry blender. If the blender isn't completely dry, the fruit will clump. Blend until broken up into small pieces. Do not over-blend or it will become powder!
Add Your Own Notes
Notes
- The one thing you have to have for this recipe is patience! While not difficult (I'll take you through step-by-step), you can't be in a hurry. It takes time to roll out, measure, and cut the dough. Plus, the dough has to be cold or it becomes difficult to handle. This means that if the dough becomes sticky or hard to work with, you'll need to place it in the freezer for around 15 minutes to chill before you can continue with the recipe.
- There are a lot of steps. However, you can pre-make the crust and the filling. The crust can be stored in the fridge for up to 3 days or frozen up to 3 months. If frozen, just allow to rest on the counter until it's soft enough to handle before using. The filling can be stored in the fridge for a week or two.
- For the sweetener in the filling, I prefer to use a Monk Fruit Allulose Blend or allulose. Monk fruit and allulose both dissolve beautifully without an aftertaste. Since they dissolve well, you can use crystallized or powdered. However, if using an erythritol-based sweetener, make sure it's powdered because erythritol doesn't dissolve as well as other sweeteners. Also, it may leave a slight cooling-like aftertaste, which is another reason I prefer the monk fruit allulose blend.
- For the frosting, any powdered keto sweetener will work. But again, erythritol-based sweeteners can leave an aftertaste - especially in frostings! Because of this, I recommend powdered monk fruit, allulose, or a monk fruit allulose blend.
- As a special gift to my readers, I've teamed up with BESTI SWEETENERS to give you guys 10% off! Simply use the code "CRAVEABLE" at checkout.
- Unfrosted, leftover pop tarts can be stored covered at room temperature for 1 to 2 days. After that, they can be frozen for up to 3 months. I don't recommend storing them in the fridge because they may get soggy. They can be reheated in the oven at 350 degrees for 5 minutes, for a few seconds in the microwave, or in the toaster as long as you don't over-toast them! The crust is a bit fragile, so if you over-toast them, they will get too hot and break apart. However, you can toast them until just heated through. And since the crust is fragile, you may need to let it slightly cool in the toaster before removing it. Then, allow them to cool, and add the frosting and sprinkles 🙂
Nutrition
NET CARBS = Total Carbs - Fiber - Allulose - Xylitol
Nutritional information is approximate and may vary. Sugar alcohols, xylitol, and allulose are included in the total carbs and fiber.
Looking for more information on the keto diet? Check out my

Elizabeth says
These look fantanstic! Do the chia seeds serve a purpose? Are you using them as a thickener? Trying to find out if I can omit any uneccesary carbs if possible. Thanks!
Cassidy Stauffer says
Oh, thank you! Yes, the chia seeds help thicken the filling. You might could try xanthan gum, but without trying it myself I'm unsure of the amount and exactly how it would turn out. Sorry I couldn't be of more help!
XO,
Cassidy
Kelly says
This looks so very good!.
Jill @ Jill's Home Remedies says
Can't wait to try these!
Tessa@TessaTheDomesticDiva says
Featuring this recipe again..THIS year!
KtchenWren says
Made these today and WOW they are great! We have one of those toaster pastry cookie cutters, makes things a little easier. For the fat, I mixed things up a bit by using about 1 Tbsp. Earth Balance spread, 1 Tbsp. coconut oil, and 2 Tbsp. palm shortening. We didn't bother thickening up the jam, just spread it on there!
Kari says
I would love to do this as PB and J sandwiches for daughters lunch and a grab and go. We are GFCF. 🙂 I did the smitten recipe before going GFCF...so glad you did the work for me to convert it to grain free 🙂
Jennifer @ The Unrefined Kitchen says
Grain-free Poptarts?! This is so exciting. I have seen "gluten-free" recipes for poptarts, but not grain-free!! I'm excited to give this a try sometime! Thank you!
CassidyS says
Amber-
Wow! I can't believe I'm being featured twice on Allergy Free Wednesdays, that's awesome!!!!
Thanks again,
Cassidy 🙂
Amber says
Hi There Cassidy,
I featured your awesome Pop Tarts this week on Allergy-Free Wednesdays. Your recipe and other highlights can be seen here: http://www.thetastyalternative.com/2012/05/allergy-free-wednesdays-week-16-may-9.html
Please join us again this week for more allergy-free fun and inspiration. 🙂
Be Well,
--Amber
CassidyS says
Rachel- Thank you so much, the pie crust worked perfect. I don't why I didn't think of it sooner!!!
Laura- I love Allergy Free Wednesdays, thank you for featuring me 🙂
r.mcnatt & Amber- Thanks, what a nice compliment!!! It's nice to be able to feed my kids pop tarts without feeling guilty.
Thanks again,
Cassidy
Laura says
WOW-My kids would go crazy for these! I am featuring this delicious recipe this week on Allergy-Free Wednesdays 🙂
Rachel says
What a great idea to use pie crust for the pop tarts! I'm sure they are a thousand times better than the store bought ones!
Have a great day!
Amber says
Seriously...you are amazing. These look incredible!! I loved Pop Tarts as a child, but won't touch them now (or give them to my kids). How fun to make a healthy version of this popular snack. 🙂
Well done!!
r.mcnatt says
Yummmmy!